Why Map Reading Matters
In Diablo II: Resurrected, your farming efficiency is measured in runs per hour. Every second spent wandering lost in a dungeon is time you could've spent fighting bosses and rolling for drops.
Finding exits in 5 seconds instead of 30 seconds might not seem like much — but over hundreds of runs, that difference compounds. A Mephisto run that takes you 45 seconds instead of a minute? That's 33% more runs per hour. More runs = more chances at that Ber rune or Highlord's.
Map reading isn't just for speedrunners. It's a farming efficiency multiplier that separates players who farm efficiently from those who burn out running the same content for worse returns.
Understanding Character Orientation
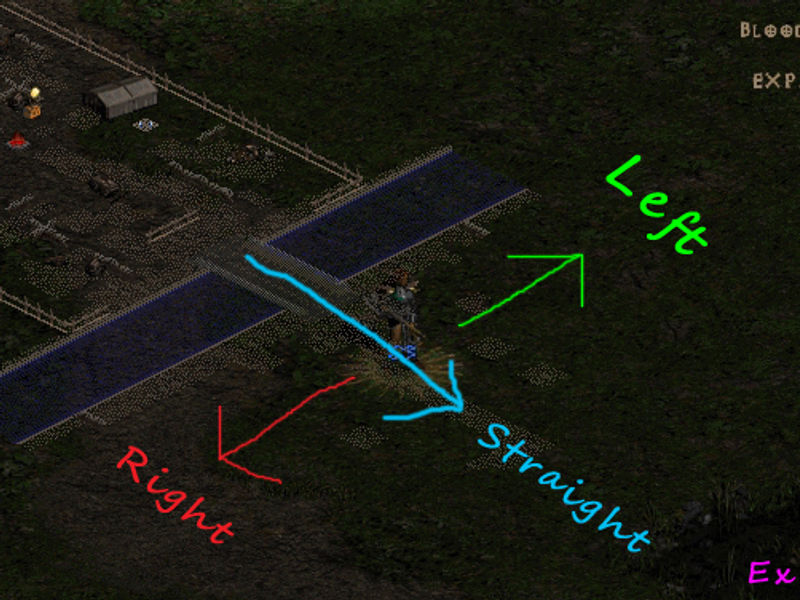
Directions are relative to your character's facing, NOT compass directions. When you enter a new area, the game doesn't care where north is — it cares which way your character is pointing.
The isometric camera means "straight" isn't up on your screen — it's upper-right when your character faces that direction. This is why the same map can feel completely different depending on where you entered.
Pro tip: In D2R, the automap shows your character orientation with a small triangle indicator. Use this to orient yourself immediately upon entering any new area.
D2R vs Classic
D2R's improved automap shows your exact position and orientation, making map reading easier than in classic D2. The minimap is larger, shows more of the surrounding area, and clearly marks waypoints and quest objectives. Use it. Open your automap as soon as you enter a new area — it's the single fastest way to orient yourself.
The Tile System
D2 maps aren't procedurally generated — they're built from pre-made tiles (sometimes called "layouts" or "seeds"). Think of them like LEGO pieces: the game picks from a set of tiles and stitches them together to create each area.
The first tile always has exactly one exit. That's your "straight" — the direction you should follow to navigate efficiently. Once you identify which tile is first, you've essentially solved that area's map.
Different tiles connect in different ways, but the pattern remains consistent: find where you entered (the first tile), identify its exit direction, and follow that general heading through the rest of the dungeon. This is why some runs feel smooth and others feel like a maze — you're either following the tile logic or fighting against it.
Act-by-Act Map Layouts
Act I — Blood Moor to Catacombs
- Cold Plains Exit is NOT in the corner
- Stony Field Tristram portal clockwise from Cairn Stones
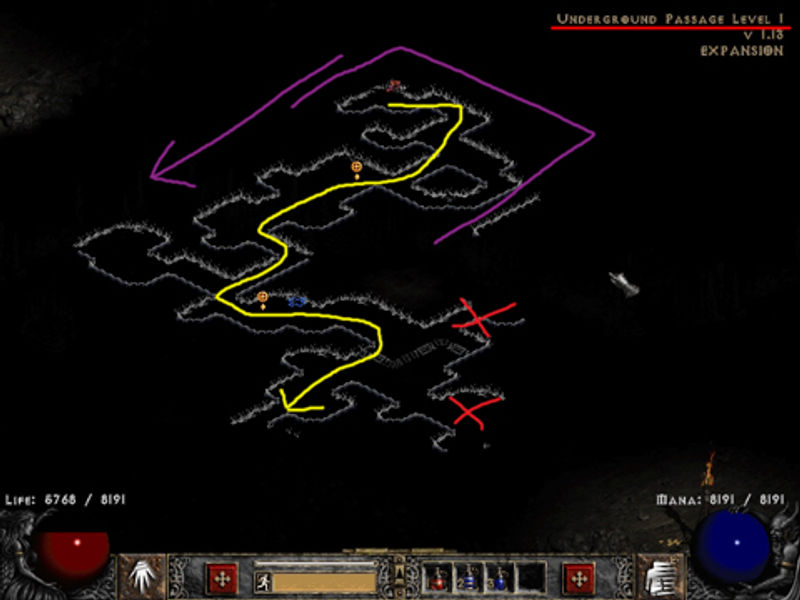
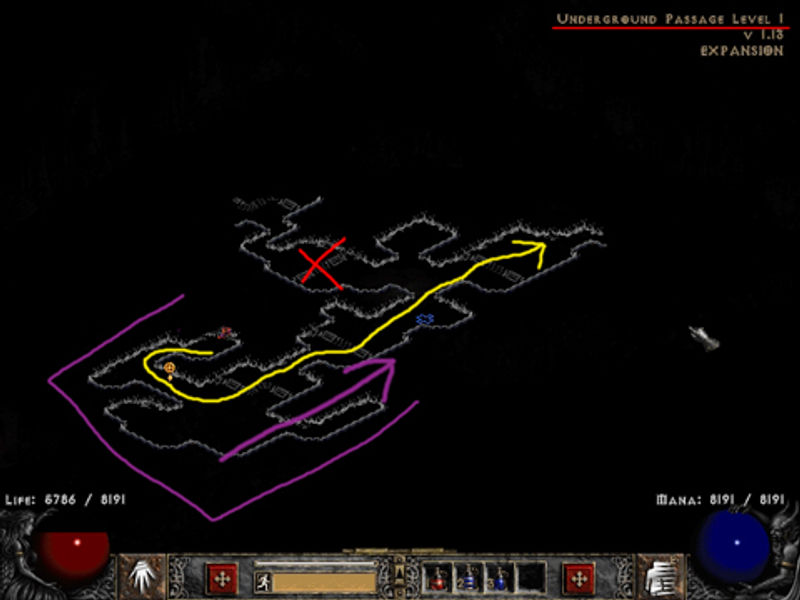
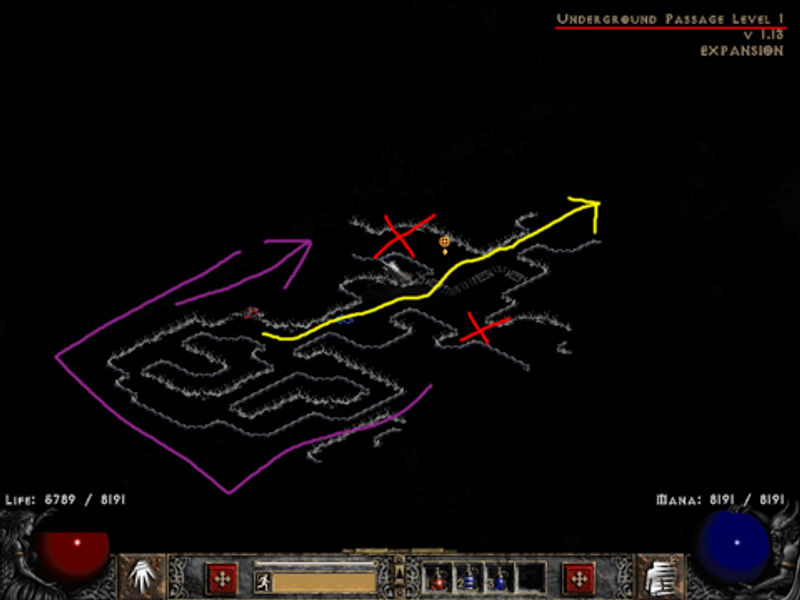
- Underground Passage Straight
- Dark Wood Tree usually left/straight from WP
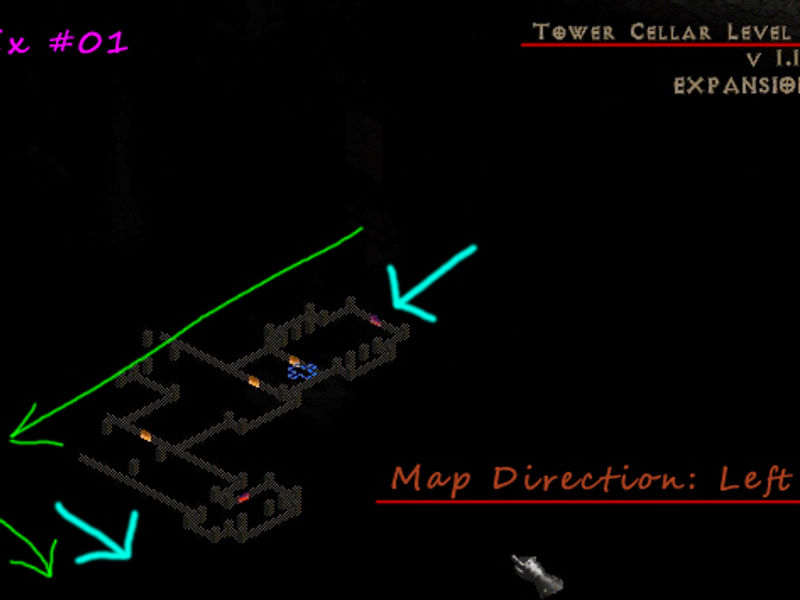
- Forgotten Tower Left (to basement)
- Outer Cloister Based on waypoint orientation
- Barracks Left or Straight to Jail
- Jail Level 1 & 2 Straight (follow hallway)
- Inner Cloister Exit always same relative position
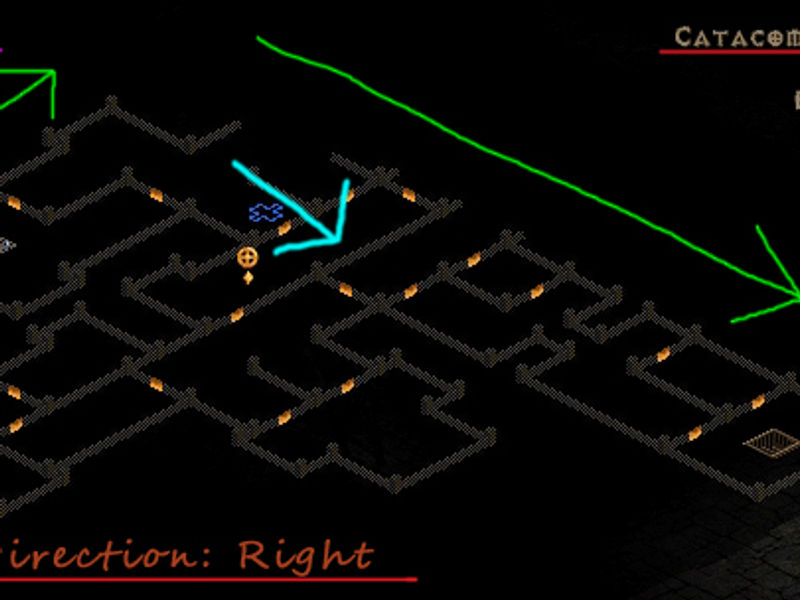
- Catacombs 2 Right of waypoint (to Level 3)
★ The Pit (Tamoe Highland)
Located in Tamoe Highland, accessed from the Outer Cloister waypoint. From WP, head back toward the entrance area — look for the dungeon entrance near the left wall from the waypoint position. The Pit is one of the best Act 1 farming spots for its high density and valuable drops.
Act II — Desert to Tal Rasha's Tomb
- Sewers Level 1 Left from entrance
- Dry Hills Far Oasis exit usually lower-left
- Halls of the Dead Left (to Level 2)
- Far Oasis Maggot Lair entrance usually right side
- Maggot Lair 1 & 2 Right (follow worm tunnels)
- Maggot Lair 3 Coldworm the Burrower + Staff of Kings
- Lost City Ancient Tunnels entrance near center
- Claw Viper Temple Left from entrance
- Arcane Sanctuary 4 arms, portal in random one
- Tal Rasha's Tomb Left (correct tomb from quest log symbol)
★ Ancient Tunnels
Hidden inside Lost City, look for a trapdoor tile. The entrance is always present in every Lost City layout, but its position varies — explore the area thoroughly to find it. The Tunnels are a prime farming spot with excellent item drop tables and relatively easy navigation.
Act III — Spider Forest to Travincal
- Spider Forest Look for dungeon entrances along edges
- Flayer Jungle Gidbinn + dungeon usually mid-right
- Flayer Dungeon 1 & 2 Left (to lower levels)
- Lower Kurast Super chests in hut clusters
- Travincal Council members around center
- Durance of Hate 1 Left from entrance (to Level 2)
- Durance of Hate 2 Left from waypoint to Level 3
Act IV — City of Pestilence to Chaos Sanctuary
- River of Flame Follow the river, WP to CS is right
- Chaos Sanctuary 3 seal bosses in fixed pattern (see below)
Chaos Sanctuary Seal Pattern
- Grand Vizier — Left arm of the layout
- Lord de Seis — Top/seal position
- Infector — Right arm of the layout
Act V — Frozen River to Worldstone Keep
- Crystalline Passage Left from entrance
- Glacial Trail Left toward Nihlathak
- Ancient's Way Left (to Worldstone)
- Worldstone Keep 1-3 General direction patterns apply
- Worldstone Keep 2 Right of waypoint (to Level 3)
★ Nihlathak's Temple (Pindle Run)
Nihlathak is found in the Halls of Vaught (reached via Halls of Anguish and Halls of Pain). He drops the Key of Destruction for the Pandemonium Event (Uber Tristram) and is a popular farming target.
Farming Route Patterns
These are the most efficient routes for popular farming spots:
Mephisto Runs
Route: Waypoint → Durance of Hate 2 → Go left from the waypoint to find Level 3
Tip: From the Durance 2 waypoint, the exit to Level 3 is to the left. Hug the left wall.
Chaos Sanctuary Runs
Route: River of Flame waypoint → Right from WP to Chaos Sanctuary
Tip: Kill the 3 seals in order (Grand Vizier → Lord de Seis → Infector), then boss Diablo spawns.
The Pit Runs
Route: Outer Cloister waypoint → Back through Tamoe Highland → Pit entrance near left wall
Tip: One of the best Act 1 farming areas. High monster density, great item tables.
Ancient Tunnels Runs
Route: Lost City waypoint → Find trapdoor (always present, position varies by layout)
Tip: The entrance is always in Lost City — explore edges and corners if you don't see it right away. Excellent for variety runs.
Pindle Runs
Route: Use Anya's portal in Harrogath (Act 5 town) — leads directly to Nihlathak's Temple entrance. No waypoint travel needed.
Tip: Pindleskin is the super unique just outside the portal. Fast kills, no map reading required.
Key Farming Routes
Countess (Tower) — Act 1, Forgotten Tower. Key for Terror.
Summoner (Arcane) — Act 2, Arcane Sanctuary. Key for Hate.
Nihlathak (Halls) — Act 5, Halls of Vaught. Key of Destruction.
Map Examples
Arrow Legend
- Blue Arrow — Character orientation + literally following the map layout
- Green Arrow — Character orientation + generally following the map layout
- Yellow Arrow — Following the correct way to the exit


Pro Tips
Hug walls in the correct direction. When you know which general direction to go, stick to one wall. This prevents getting lost in open areas and ensures you find the exit when it branches.
Use Teleport for instant map revelation. Sorceress with Enigma (or even just Teleport from any class) can instantly reveal the entire tile layout by teleporting forward. This is why Teleport is so valuable for farming — you find exits in seconds, not minutes.
Open your automap as soon as you enter a new area. D2R's improved automap shows your position and orientation. Getting in this habit takes milliseconds but saves huge amounts of time over hundreds of runs.
Dead ends mean backtrack. If you hit a dead end with no exit, the answer is simple — turn around. The exit is always in another direction. Don't waste time searching dead-end rooms.
In multi-level dungeons, the pattern usually repeats. If you learned that Act 2 Maggot Lair is "Right," that pattern applies to all three levels. The tile layout stays consistent across floors.
Practice with your most-farmed areas first. You don't need to master every area. Pick 2-3 spots where you farm most (Mephisto, Chaos, Pindle) and learn those layouts perfectly. Everything else is bonus.
Find Your Drops Faster
Map reading helps you navigate faster — but what about actually spotting your drops in the chaos of combat? Our loot filter highlights valuable items so you never miss a Ber, Lo, or Shako again.
Try the Loot Filter →⚔️ Get More Loot with Better Gear
Upgrade your D2R setup. Buying through these links supports DiabloBytes at no extra cost to you.
Corsair MM300 Extended
Anti-fray stitched edges. Durable desk mat that survives thousands of clicks.

Xbox Wireless Controller (2025)
D2R has full controller support. Kick back on the couch for casual farming runs.

MSI RTX 4070 Super Gaming X Slim
4K-ready GPU. D2R at max settings with headroom for everything else.
As an Amazon Associate, DiabloBytes earns from qualifying purchases.