Hydra Sorceress Build Guide — Ladder Starter
By the DiabloBytes team · Updated June 2026 · Season 14 / Patch 3.2
Overview
The Hydra Sorceress is one of the best Ladder Starter builds in D2R — it delivers easy access to single-target damage for Key Farming and Bossing with minimal gear investment. Hydra summons a three-headed serpent on the targeted location that auto-fires fire bolts at nearby enemies for 10 seconds. You can have up to 6 Hydras active simultaneously (18 heads total). The playstyle is simple: stack Hydras on a chokepoint, apply Frost Nova for crowd control, and clean up with Fire Ball. No aiming required.
This build easily reaches the 105% FCR Breakpoint, leaving room to stack Magic Find or raw damage across your remaining gear slots. The Best-in-Slot gear — Heart of the Oak, Spirit, Flickering Flame — transitions seamlessly to other endgame builds if you decide to respec later. For early Ladder when gear is scarce, Hydra's autonomous output is unmatched: it doesn't require Infinity, and competently clears Chaos Sanctuary and Baal runs on a skeleton budget.
The downsides: fire immunities are a constant roadblock in Hell without a Flame Rift or Infinity Mercenary, AoE clear speed is limited compared to Blizzard or Lightning builds, and the playstyle can get repetitive. But for the first two weeks of a season? Hydra is king.
- Iconic, low-APM playstyle
- Great Mephisto farming
- Stacks a lot of Magic Find
- Very low gear cost requirements
- BIS gear transitions to other builds
- Low AoE clear speed
- Single damage type (Fire)
- Repetitive playstyle
- Limited farming locations
Skill Allocation
Max skills in this exact order. The ordering matters — Hydra first maximizes your damage as you level.
1-Point Utility Skills
Max (20 Points Each) — In Order
Stat Points
Gear

Real-world gear · affiliate
In-game gear aside, the one peripheral that changes how this build plays is a high-button MMO mouse — bind every skill, potion, and town portal to your thumb instead of hunting the keyboard mid-fight. The Razer Naga line (12–19 buttons) is the ARPG staple.
Priority stats: Resistances → Faster Cast Rate (target 105%) → Faster Hit Recovery → +All Skills. The core runewords — Spirit, Stealth, Lore, Ancients' Pledge — cover everything you need to farm starter zones.
Best: Heart of the Oak — +3 All Skills, 40% FCR, +40 All Resistances. The gold standard for caster weapons.
Mid: Obsession Archon Staff — +4 All Skills, 65% FCR, FHR, and resistances in a single runeword.
Budget: Leaf Staff (Tir + Ral) — +3 Fire Skills, Fire Bolt synergy. Best early-ladder weapon by far; enables Hydra before you can afford anything else.
Best: Spirit Monarch — +2 All Skills, 35% FCR, FHR, +89 Mana. Requires 156 Strength; build toward this ASAP.
Budget: Rhyme (Shael + Eth) — Cannot Be Frozen, 25% MF, resistances. Or Ancients' Pledge for all-resistance coverage early on.
Best: Call to Arms (Crystal Sword) + Spirit Monarch — Buff with Battle Command × 2 and Battle Orders at the start of every run. These buffs are essential; keep them active at all times.
Budget: Any CTA weapon. The buff is worth building even on a budget.
Best: Flickering Flame Diadem — Reserves a fire aura that reduces enemy fire resistance by 10–15%. Massive damage multiplier against non-immune enemies.
Mid: Harlequin Crest (Shako) — +2 All Skills, MF, Life/Mana. Excellent all-rounder if you don't have Flickering Flame.
Budget: Lore (Ort + Sol) — +1 All Skills, Lightning Resist. Easy to make, meaningful early bonus.
Best: Chains of Honor — +2 All Skills, resistances, damage reduction. Excellent defensive stats.
Mid: Skin of the Vipermagi — +1 All Skills, 30% FCR, all-resist. Great mid-tier option.
Budget: Stealth (Tal + Eth) — 25% FCR, FHR, mana regeneration. One of the best budget armors in the game.
Best: Magefist — +1 Fire Skills, 20% FCR, Mana Regeneration. Efficient FCR + fire damage glove.
Alt: Trang-Oul's Claws — 20% FCR, Cold Resist. Good alternative if you need resistance coverage.
Budget: Any rare/magic gloves with FCR and resistances.
Best: Arachnid Mesh — +1 All Skills, 20% FCR, +5 Mana/kill. One of the most important FCR slots for hitting 105%.
Mid: Goldwrap — MF, Gold Find. Use when stacking Magic Find.
Budget: Any rare/magic belt with FCR and resistances.
Best: War Traveler — +40–50 Attributes, 25–40% MF. Best MF boots in the game.
Alt: Sandstorm Trek — Strength/Vitality, FHR, Poison Resist. Best defensive option.
Budget: Any boots with Faster Run/Walk, resistances, and FHR.
Best: Mara's Kaleidoscope — +2 All Skills, +20–30 All Resistances. Near-best-in-slot for all casters.
Alt: Crafted Caster Amulet — Can roll +2 Sorc Skills + FCR + Resistances for a theoretical upgrade.
Budget: Magic/rare amulet with +Skills and resistances.
Best: Stone of Jordan × 2 — +1 All Skills, +Max Mana. Best raw damage rings; also used to access Uber Diablo.
Alt: Nagelring — MF, if you're prioritizing item find.
Budget: Rare rings with FCR, resistances, and Life/Mana.
Unique: Hellfire Torch (Sorceress) + Annihilus — Essential endgame charms for +Skills and all attributes.
Grand Charms: Fire Skillers (+1 Fire Skills, Life) — Fill remaining slots with these.
Sunder Charm: Flame Rift — Breaks ALL Fire Immune monsters, reducing them to 95% resistance. Pair with -% Enemy Fire Resistance gear and Lower Resist charges.
Small Charms: Life/Resistance small charms to cap resistances and fill Life gaps.
FCR Breakpoints
Faster Cast Rate reduces the animation time between casts. Target the 105% FCR Breakpoint — the sweet spot that's achievable with early gear while leaving room for MF stacking. Higher breakpoints exist but require sacrificing too much elsewhere.
BIS Weapon (HotO) + Armor (Vipermagi) + Gloves (Magefist) already provides 85% FCR — you only need 20% more from Belt (Arachnid Mesh) to hit 105%.
Mercenary
The Act 2 Might Mercenary is your endgame choice. The Might aura provides a damage bonus that helps him kill Fire Immunes before you acquire your Flame Rift sunder charm. Focus on giving your merc Resistances and Life — he needs to stay alive to be useful.
Playstyle Tips
- Stack up to six Hydras at a chokepoint so all heads fire in the same direction at the same target. This is your primary damage pattern — place, don't spam cast.
- Use Frost Nova when enemies close in — the chill CC buys time for your Hydras to fire. Then Teleport backward to create space.
- Spam Static Field while Hydras are firing on a boss or elite to rapidly reduce their Life pool. Essential for Mephisto runs.
- Open every run with your Call to Arms swap: cast Battle Command × 2, then Battle Orders. These buffs dramatically improve your Life/Mana and +Skills. Keep them active.
- Skip fire immunes early on. There's no reward for killing every enemy — focus on packs you can burn efficiently.
- Use Telekinesis constantly: on Waypoints, Stash, Town Portals, and to pick up potions from range. The time savings add up across hundreds of runs.
- If you lack Infinity: buy a Lower Resist Wand from Nightmare Drognan (Act 2). It breaks some immune and highly-resistant monsters. Repair it with Chipped Gem + Ort Rune in the Horadric Cube.
- Hydras can fire through walls. Cast them on the other side of the moat for safe Mephisto farming — a classic exploit that still works.
Leveling Progression
Hydra unlocks at level 30. Use standard fire leveling until then, saving your Normal difficulty respec for the transition.
Highlight Hydra Sorceress Drops
Highlight fire skill orbs, +Fire Skills charms, Heart of the Oak runes (Ko + Vex + Pul + Thul), Infinity runes (Ber + Mal + Ber + Ist), and Arachnid Mesh.
Open Loot Filter Configurator →Build Summary
- Class Sorceress
- Primary Skill Hydra
- Damage Type Fire
- Difficulty ⭐ Easy
- Tier B (S Early Ladder)
- FCR Target 105%
- MF Viable Yes
- SSF Viable Yes
- Patch Season 14 / 3.2
⚔️ Gear That Helps This Build
Hand-picked for Diablo players. Buying through these links supports DiabloBytes at no extra cost to you.
Razer Naga V2 HyperSpeed
19 programmable side buttons — bind every skill, potion, and town portal. The ARPG mouse.

Dark Project Diablo IV XL Mousepad — Inarius & Lilith
Officially-licensed XL desk mat with Inarius/Lilith key art — the rare peripheral that is both genuinely useful and on-brand.
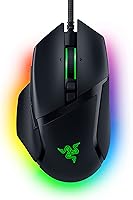
Razer Basilisk V3
11 programmable buttons with HyperScroll. Wired reliability at an incredible price.
As an Amazon Associate, DiabloBytes earns from qualifying purchases.