Strafe Amazon Build Guide — Bowazon
By the DiabloBytes team · Updated June 2026 · Season 14 / Patch 3.2
Overview
The Strafe Amazon — affectionately called the Bowazon — is the premier physical bow build in Diablo II: Resurrected. Strafe locks the Amazon into an auto-targeting barrage, firing rapid arrows at every enemy in range. In a corridor or a tight room, Strafe is absolutely devastating: every arrow finds a target, and with high physical damage from Faith or Windforce, monsters melt before they can close the gap.
The build's greatest strength is its easy, one-button playstyle — hold Strafe and everything dies. It excels in corridor-heavy areas like Stony Tomb, Maggot Lair, and Travincal. It's also a surprisingly accessible early ladder build thanks to Buriza-Do Kyanon covering most of your early needs, and an excellent transition point into a Multiple Shot Amazon for even faster endgame clears. With 100% Pierce chance and Crushing Blow, it punches well above its weight for a single-damage-type build.
The main weaknesses are its long attack animation and limited top-end damage. Strafe only targets enemies already in range, so in wide-open maps it underperforms compared to Multiple Shot. The single physical damage type is also a hard counter against physical immunes — Atma's Scarab amulet (5% chance to cast Amplify Damage on strike) solves most of this problem. Survivability is manageable with Life Stolen per Hit, but Souls packs and burst damage are real threats.
Skill Allocation
First, put 1 point into Valkyrie and 1 point into Pierce (enough to reach 69% pierce chance — gear fills the rest to 100%). Then max skills in this order: Strafe → Guided Arrow → Multiple Shot → Critical Strike → Penetrate with remaining points.
Stat Points
Gear

Real-world gear · affiliate
In-game gear aside, the one peripheral that changes how this build plays is a high-button MMO mouse — bind every skill, potion, and town portal to your thumb instead of hunting the keyboard mid-fight. The Razer Naga line (12–19 buttons) is the ARPG staple.
Budget / Starter (Hell Entry)
Bow: Buriza-Do Kyanon (Ballista) — massive physical damage, built-in pierce (100% piercing attack), cold damage. Does the heavy lifting in early Hell and is nearly irreplaceable before Faith. Upgrade the base for even more damage when your other gear improves.
Helm: Sigon's Visor (3-piece Sigon's set) — combined with Sigon's Gage and Sabot, this grants enormous Attack Rating bonuses that help you hit enemies reliably before Penetrate is maxed.
Armor: Treachery (Shael + Thul + Lem) — Fade proc for resistances, IAS for faster Strafe rate. Excellent budget chest.
Belt: Death's Guard Demonhide Sash — Cannot Be Frozen. This is critical so you don't need Raven Frost on a ring slot early.
Gloves: Laying of Hands — IAS, fire damage, demon killing bonus. Or Sigon's Gage for the Attack Rating set bonus.
Boots: Sigon's Sabot (for set bonus) or Sandstorm Trek for resistances and stat bonuses.
Amulet: Angelic Wings (2-piece Angelic set with Angelic Halo ring) — enormous Attack Rating bonus for early game.
Rings: Angelic Halo (for set AR bonus) + rare ring with life/mana leech.
Best-in-Slot (Endgame)
Bow: Faith runeword (Ohm + Jah + Lem + Eld) in a +3 Strafe Grand Matron Bow — Level 12–15 Fanaticism aura dramatically boosts attack speed, damage, and AR for you and your merc. This unlocks faster attack breakpoints and frees up gear slots.
Bow Alt: Windforce — raw physical damage king if you can't afford Faith. Requires 188 Strength.
Bow Alt 2: Mist runeword (Cham + Shael + Gul + Thul + Ith) in a Matriarchal Bow — Level 8–12 Concentration aura and 100% Pierce built in. Strong Faith alternative.
Helm: Guillaume's Face — 35% Crushing Blow, 15% Deadly Strike, IAS, strength. The top endgame helmet. Socket with a 15% IAS jewel to hit breakpoints, or a Ber for damage reduction.
Helm Alt: Andariel's Visage socketed with Ral rune (to offset fire penalty) — life leech, +2 skills, IAS, deadly strike.
Armor: Fortitude (El + Sol + Dol + Lo) — 300% Enhanced Damage, massive life bonus. Best endgame chest for raw damage. Alternatively Enigma for Teleport repositioning or Chains of Honor for resistances and +2 skills.
Belt: Razortail — 33% piercing attack pushes you to 100% pierce with your Pierce skill point. Essential for every arrow to cleave through entire enemy lines.
Gloves: Laying of Hands — IAS, fire damage (great against Demons), Knockback. Or Lava Gout for Enchant proc.
Boots: War Traveler — +10–15 min/max damage, 25% MF, fast run/walk. Strong all-rounder. Or Gore Rider for Crushing Blow/Deadly Strike/Open Wounds.
Amulet: Atma's Scarab — 5% chance to cast level 2 Amplify Damage on strike. This breaks 99% of physical immunities you encounter and is the primary way Strafe Amazons handle physical immunes. Don't leave town without it.
Amulet Alt: Highlord's Wrath — +1 skills, IAS, Deadly Strike. Better raw DPS but loses the immune-breaking utility.
Rings: Raven Frost (Cannot Be Frozen, Dexterity, Attack Rating) + rare ring or Bul-Kathos' Wedding Band with life leech and life.
Weapon Switch: Harmony runeword Hunter's Bow (Tir + Ith + Sol + Ko) — Level 10 Vigor aura for +40% faster run/walk. Swap to this between packs to run faster, then swap back to main bow.
Weapon Switch Alt: Call to Arms + Spirit Monarch — cast Battle Orders and Battle Command before every farming session.
Charms: Bow & Crossbow grand skillers (Gheed's Fortune for MF), Annihilus, Hellfire Torch, Bone Break (Sunders physical immunes), life/resist small charms.
Magic Find Variant
For Magic Find farming (P1–P2), swap Guillaume's Face for Stealskull (dual leech + MF), and swap Laying of Hands for Chance Guards. You'll need a 15% IAS jewel in your helmet socket to maintain IAS breakpoints. This variant trades some killing speed for substantially better item drops.
Mercenary
Act 2 Nightmare Mercenary with Might aura is the standard pick for all variants. The Might aura's physical damage multiplier stacks with Faith's Fanaticism and amplifies your already high per-arrow damage.
- Weapon (Endgame): Pride runeword (Cham + Sur + Io + Lo) — Level 16–20 Concentration aura provides massive off-weapon Enhanced Damage. This is the endgame merc weapon of choice, not Infinity (Conviction doesn't help physical damage).
- Weapon (Budget): Insight Partizan or Insight Great Polearm — Level 12–17 Meditation aura for infinite mana. Solid until you can afford Pride.
- Armor: Fortitude (El + Sol + Dol + Lo) — 300% Enhanced Damage and a large life bonus keeps the merc alive and dealing damage. If he's too squishy, downgrade to Shaftstop or Treachery.
- Helm: Andariel's Visage socketed with Ral rune (fire resist offset) — life leech, IAS, +2 skills. Or Vampire Gaze Grim Helm for the dual leech and damage reduction if survivability is an issue.
- Budget Helm: Bulwark Crown — defense and resistances. Pairs well with Treachery in the starter setup.
Note: The endgame Pride merc is squishy because he doesn't leech his own damage well. If he dies constantly, swap his helmet to Vampire Gaze and/or his armor to Shaftstop until you can invest in better gear.
📺 Video Guides
Learn this build from the best D2R content creators:
Guide by MacroBioBoi — full Strafe Bowazon endgame guide with gear and demos
Comprehensive Strafe Bowazon guide — stats, skills, gear, and area demos
Leveling Progression
Follow the Amazon Leveling Guide to reach Level 75 before setting up your Strafe build fully. Here's the general roadmap:
Playstyle Tips
- Move between every Strafe use. The instinct is to stand still until everything dies — resist it. Step between each Strafe animation to regain mobility and dodge incoming hits. This is one of the biggest mechanical improvements you can make.
- Line up your shots. Strafe randomly targets any enemy in range. The more enemies standing in a row in front of you, the more Pierce hits each arrow lands. Corridors = maximum damage. Open areas = reposition to create lines.
- Swap to Harmony between packs. Keep a Harmony Hunter's Bow on weapon switch for the Level 10 Vigor aura (+40% run speed). Swap to it while moving to the next pack, then swap back before engaging. Massively improves clear speed.
- Use Decoy before engaging dangerous packs. Cast Decoy far ahead of you to activate enemies and draw their fire, especially against Souls packs. This gives you time to set up your angle before enemies reach melee range.
- Use Multiple Shot to escape. If you get surrounded, fire Multiple Shot in a single direction to blow open an escape path, then reposition to a better angle for Strafe.
- Atma's Scarab handles most physical immunes. The 5% Amplify Damage proc on Atma's removes physical immunity from nearly every monster in the game. Let it proc, then Strafe will damage them normally.
- Pre-buff every session. Use Call to Arms for Battle Orders + Battle Command before starting any farming run. If using Lava Gout gloves, cast Enchant from Demon Limb on yourself. Swap to Mania bow to proc Burst of Speed, then swap back.
- Direct your Valkyrie at bosses. Once you've cleared regular monsters, use Guided Arrow on champions and bosses while your Valkyrie holds aggro. The burst DPS from Guided Arrow combined with Crushing Blow (from Guillaume's Face) shreds boss life pools fast.
Filter for Bowazon Drops
Highlight Faith rune words (Ohm, Jah, Lem, Eld), Guillaume's Face, Razortail, Atma's Scarab, and War Traveler. Never miss a key Bowazon upgrade again.
Open Loot Filter Configurator →Build Summary
- Class Amazon
- Primary Skill Strafe
- Damage Type Physical
- Playstyle Ranged / Auto-Turret
- Difficulty Easy–Medium
- Tier A
- Best Area Corridors / Travincal
- Key Item Faith / Atma's Scarab
- MF Viable Yes (swap variant)
⚔️ Gear That Helps This Build
Hand-picked for Diablo players. Buying through these links supports DiabloBytes at no extra cost to you.
Razer Naga V2 HyperSpeed
19 programmable side buttons — bind every skill, potion, and town portal. The ARPG mouse.

Dark Project Diablo IV XL Mousepad — Inarius & Lilith
Officially-licensed XL desk mat with Inarius/Lilith key art — the rare peripheral that is both genuinely useful and on-brand.
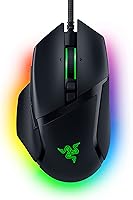
Razer Basilisk V3
11 programmable buttons with HyperScroll. Wired reliability at an incredible price.
As an Amazon Associate, DiabloBytes earns from qualifying purchases.